Install and Configure txAdmin on Pterodactyl
Discover how to install and configure txAdmin on your FiveM server hosted on Pterodactyl. This complete tutorial covers port allocation, initial setup, choosing between server import or template, and connecting to your MySQL database.
1. Open a port
In the panel, in the Network section, click the Create allocation button to open an additional port.
If you already have 2 ports open, you don't need to open another one.
Just identify the port that is not used by the server.
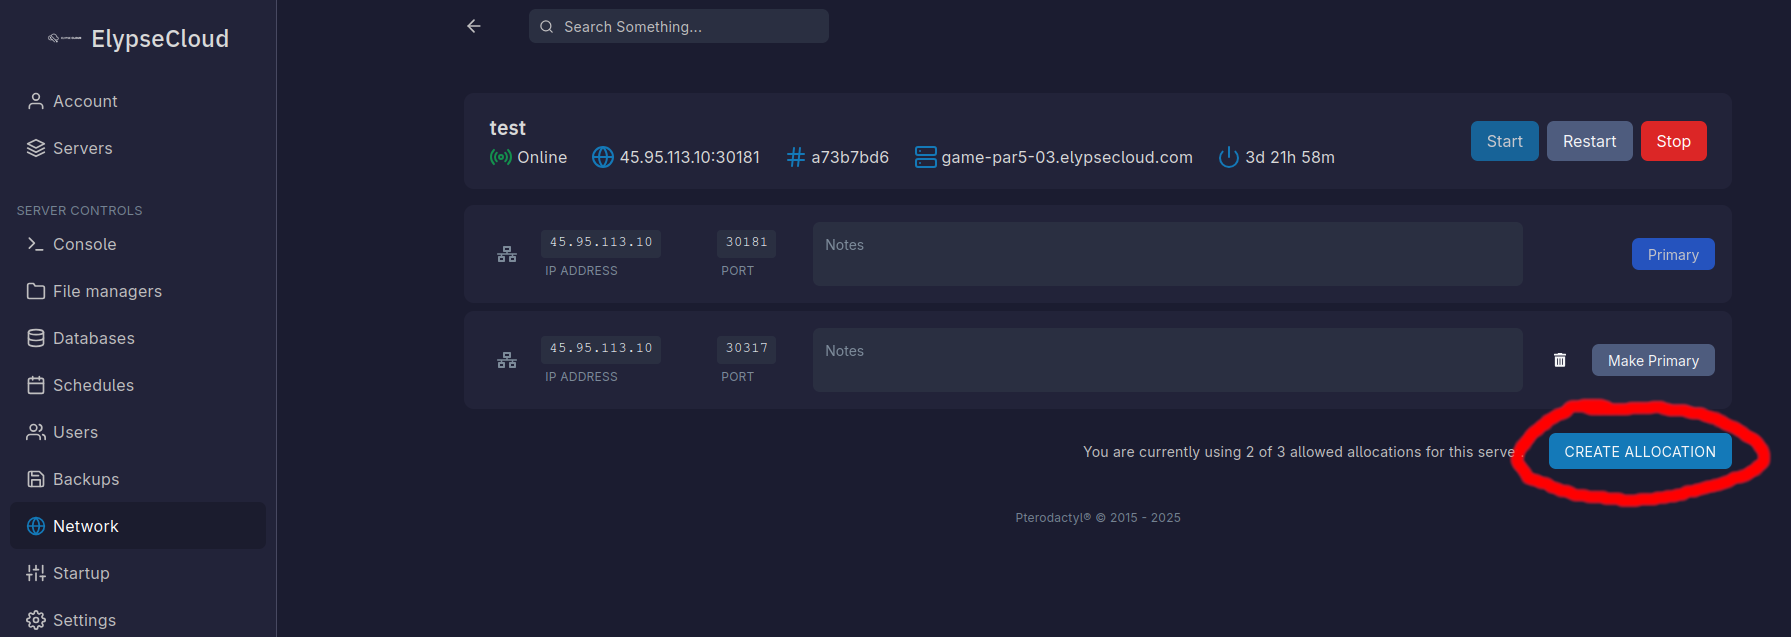
If you don't see the Create allocation button, please contact us on discord so we can add an additional port to your server.
2. Copy the port
Copy the newly opened port.
The Primary port is the main port of your server. It is used to connect to the server.
The Make Primary port is the secondary port, used for TxAdmin or other uses.
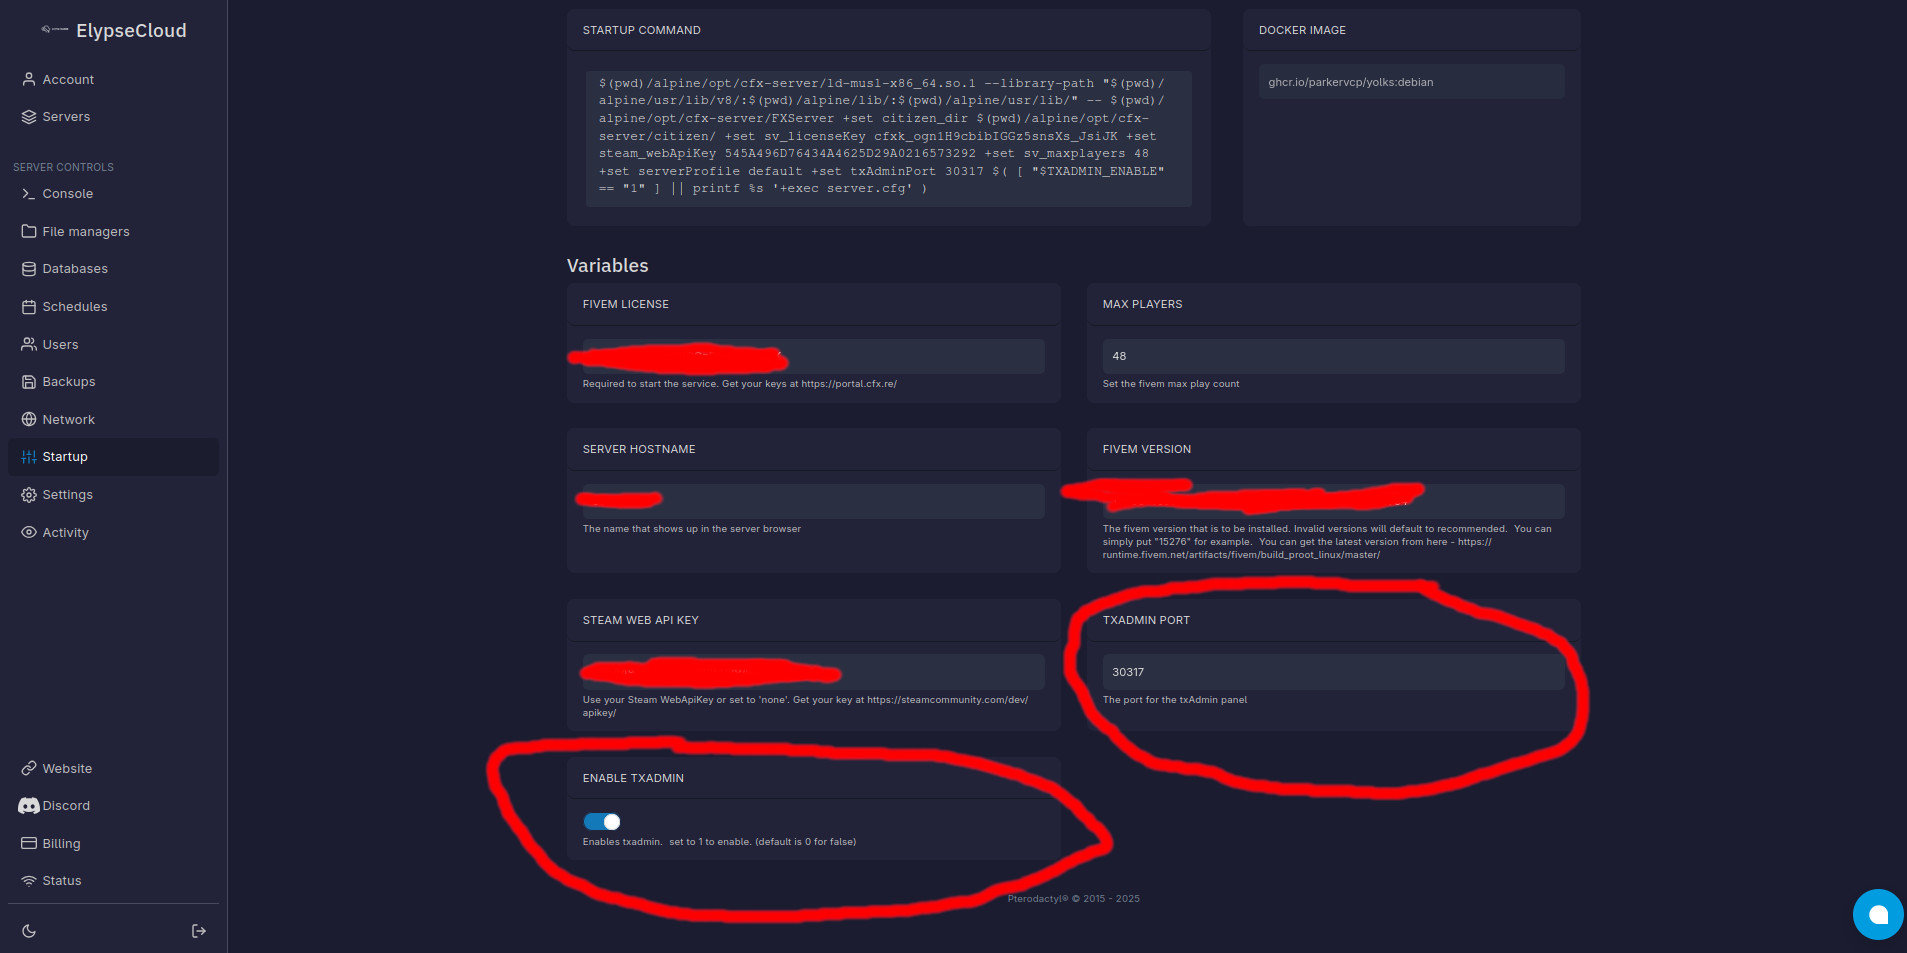
3. Paste the port and check the box
Go to the Startup section of the panel:
- paste the port in the txAdmin Port field (here at the bottom right).
- check the Enable txAdmin box (here at the bottom left).
4. Restart the server
Restart your server to apply the changes.
If the server refuses to stop, use the Kill button to force shutdown.
This is a known issue with FiveM coupled with Pterodactyl and is not related to ElypseCloud.
5. Access txAdmin
You should see a message with the link to txAdmin after a few seconds.
Copy the PIN.
The link is clickable and will redirect you to the txAdmin interface.
No txAdmin is open on 40120, please check the port in the Startup section of the panel.
6. Authentication
On the txAdmin authentication page, enter the PIN generated.
7. Create the main account
Log in with your FiveM account to create the Master Account.
8. Authorization
Click CONTINUE to authorize txAdmin to use your cfx.re account information.
9. Backup password
Choose a backup password (used if the cfx.re connection fails).
10. Server name
Replace change-me with your server name.
The name can be changed at any time in the txAdmin panel.
Now you have several choices
- Import your server
- Use a TxAdmin template
Import your server
- Choose Local Server Data to use the current server files.
- Enter
/home/containeras your server root. - Click Save to automatically detect your
server.cfgfile. - Click Save & Start Server to save all configurations and start the server.
Use a TxAdmin template
-
Choose Popular Recipes to use a TxAdmin template.
Url or Custom TemplatesThis documentation cannot cover this section as it is case by case. There are many templates and each template has its own specificities. Please refer to the documentation of the template chosen.
-
Choose the template of your choice.
-
(Optional) Change your server path.
PathThe path is the access path to your server. Servers are by default in
/home/container/txData/XXXXxxxx_XXXXX.base. You can change it if you wish, for example to/home/container/server/.File confusionWith a template, your server files are not located at the root of your server (
/home/container). -
Click Go to Recipe Deployer to save the configuration.
-
Click Next to move to the next step.
-
Enter your license key.
License keyLicenses keys are now managed on Portal Cfx (formerly keymaster).
-
Click Show/Hide Database options to configure the database.
-
In the ElypseCloud panel, in the Databases section, create a new database (unless you already have one).
-
Get the database information and paste it into txAdmin.
Lexicon- Host: the IP address of the database (without
:3306). - Port: the database port (default
3306). - Username: the database username.
- Password: the database password, accessible via the eye.
- Database Name: the name of the database (usually SXXX_thenameyouentered).
- Host: the IP address of the database (without
-
Leave Delete Database unchecked.
-
Click Run Recipe to start the template deployment.
Stuck?If you get stuck, check your database connection information.
Otherwise, open a ticket on our discord.
-
Change the port in the endpoints lines with the Primary port of the server.
Why change the port?No server is open on port 30120, it's a default port for TxAdmin templates.
-
Click Save & Start Server to save the configuration and start the server.
🎉 Congratulations
You have now configured txAdmin under Pterodactyl!
If you encounter any issues, open a ticket on our discord.