Secure RDP Against Bot Attacks
Protect your Windows VPS against automatic bot attacks attempting to connect to the Administrator account. This guide explains how to rename the Administrator account and apply RDP security best practices to prevent remote access lockouts.
The problem
Your Windows VPS is accessible via Remote Desktop Protocol (RDP). Bots continuously scan the Internet and attempt to connect to all servers they detect.
Their strategy? Try the "Administrator" account with thousands of different passwords.
What happens:
- The bot attempts multiple connections with "Administrator"
- Windows detects repeated failures and locks the account
- You end up locked out just like the bot
If the "Administrator" account is locked, you will not be able to connect via RDP, even with the correct password.
You must use the VNC console from your hosting provider to unlock the account or rename the user. Connect via VNC
The solution
Rename the "Administrator" account to something unpredictable.
Bots will continue to target "Administrator" which no longer exists, while you connect normally with your new name. Simple and effective.
Other solutions exist, such as configuring a whitelist of IP addresses allowed to connect via RDP, or using a VPN to secure access.
However, renaming "Administrator" is the quickest and easiest method to implement.
Via the graphical interface
Note that there are several methods to solve this problem. The method presented here uses the graphical interface of Windows Server not connected to an Active Directory domain.
1. Access the Computer Management graphical interface
If your VPS is part of an Active Directory domain, some options may be managed by group policies. In this case, contact your system administrator before making changes.
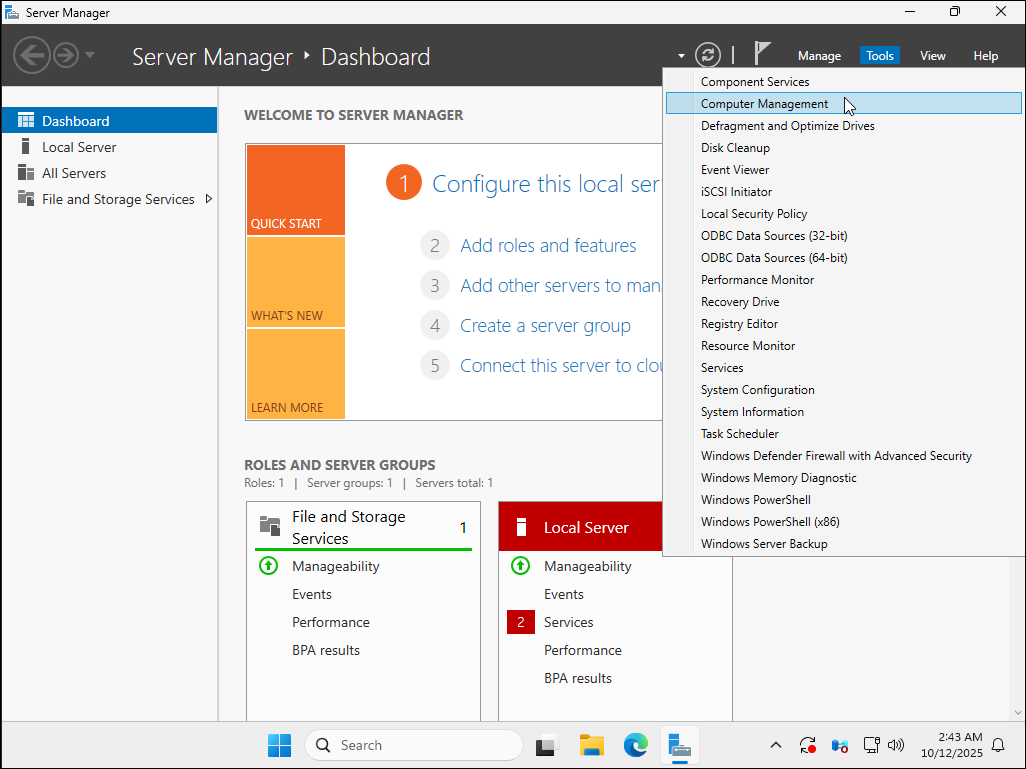
In the Server Manager, click Tools in the top right, then select Computer Management.
If the Server Manager does not open automatically at startup, you can launch it
manually from the Start menu.
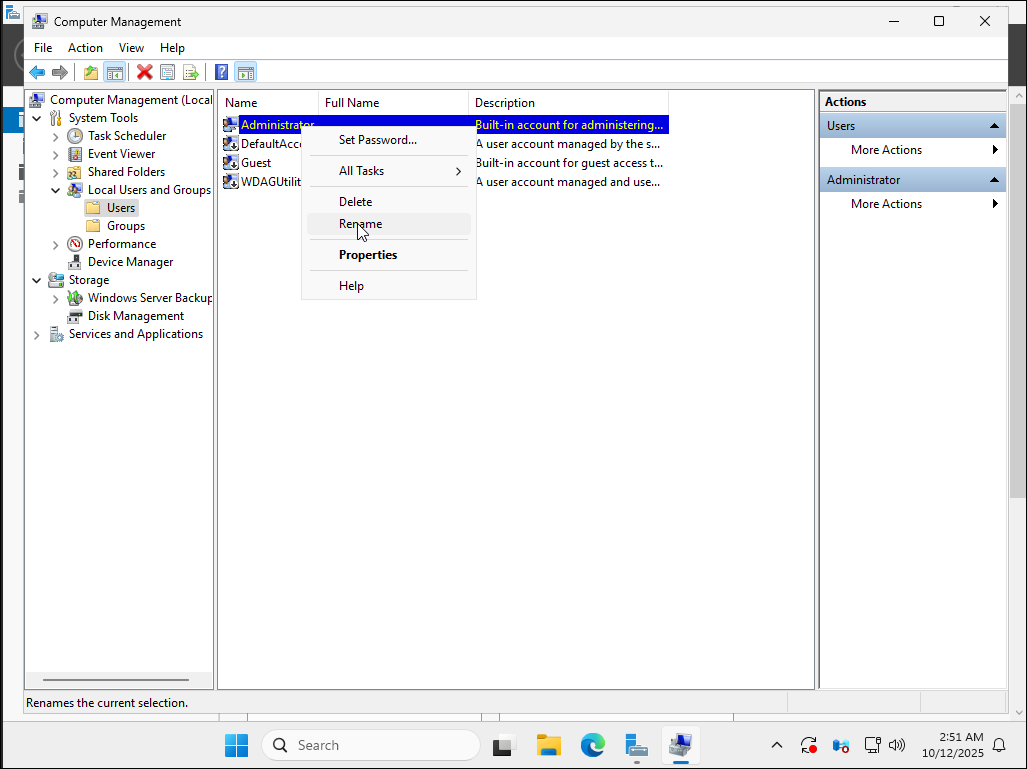
2. Access Local Users and Groups
In the left panel, expand Local Users and Groups, then click Users.
You will see a list of local users on the VPS.
Then, right-click on the Administrator user and select Rename.
3. Rename the Administrator user
Change the name of the Administrator user to a more complex and difficult to guess name, for example Admin2025!
or a custom name.
Avoid using common, obvious or already existing names. A complex username reduces the risk of brute force attacks.
Example names to avoid: Admin, Administrator, User, Test.
4. Reconnect with the new username
Once the rename is done, your current session remains active, but your next RDP connection must use the new username.
For example, if you renamed Administrator to Admin2025!, you must enter:
- Username:
Admin2025! - Password: the one you had (or the new one if you changed it)
Note your new username well before disconnecting! If you forget it, you will need to go through the VNC console of your hosting provider to regain access.
5. (Optional) Change the password
You can also change the default password generated by ElypseCloud for the Administrator user.
Right-click on the renamed Administrator user, then select Set Password....
Changing the password is optional, but recommended to regularly strengthen security.
We invite you to follow the best practices of MesServicesCyber.
You can also test your password strength on Bitwarden Strength Testing Tool.
Via PowerShell
If you prefer to use PowerShell to rename the Administrator user, follow the steps below.
1. Open PowerShell as administrator
Right-click on the Start menu and right-click on Windows PowerShell then select
Run as administrator.
2. Rename the Administrator user
Use the following command to rename the Administrator user:
Rename-LocalUser -Name "Administrator" -NewName "ElypseCloudAdmin2025!"
Replace "ElypseCloudAdmin2025!" with the username of your choice.
Also, replace "Administrator" with the current user name if you have already renamed it.
3. Verify the change
To verify that the change has been made, use the following command:
Get-LocalUser
This will display a list of local users, including the newly named user formerly called Administrator.
Additional RDP Security Best Practices
Beyond renaming the Administrator account, here are additional RDP hardening recommendations for Windows Server security:
Configure Account Lockout Policy
Configure your RDP lockout policy to limit failed login attempts:
- Open
Local Security Policy(search for "secpol.msc") - Navigate to
Account Policies>Account Lockout Policy - Set:
- Account lockout threshold: 5 invalid attempts
- Account lockout duration: 30 minutes
- Reset account lockout counter: 30 minutes
This prevents brute force attacks while allowing legitimate users to retry.
Other Security Measures
- Change RDP port from default 3389 to a custom port
- Use strong passwords for all accounts (minimum 12 characters)
- Enable Network Level Authentication (NLA) for RDP
- Use a VPN to restrict RDP access to trusted networks only
- Configure Windows Firewall to allow RDP only from specific IP addresses
- Keep Windows updated with the latest security patches
- Enable two-factor authentication if possible
- Monitor failed login attempts in Event Viewer
🎉 Congratulations
Your Windows VPS is now much more secure against automated bot attacks! By renaming the Administrator account and applying RDP hardening techniques, you've significantly reduced the risk of unauthorized access.
If you encounter any issues, open a ticket on our Discord.